
Tamping vs Leveling: What’s The Difference in Espresso Prep?
Are you just pressing down your espresso puck and hoping for the best?
When I bought my Barista Express a few years back, I was excited to pull shots at home.
I seriously had no clue what I was doing. One thing that really tripped me up was when a friend of mine (he’s a barista at this tiny but legit café) asked if I was leveling before tamping.
I just stared at him like he’d asked me to recite espresso poetry. I thought tamping was the only step.
Thankfully, he didn’t laugh. Well, not too hard at least. He explained the difference and showed me how to use a WDT tool, and that changed my whole espresso game.
Suddenly, my shots stopped gushing on one side and I started getting that creamy, balanced extraction I was chasing.
In this guide, I’ll walk you through exactly what leveling and tamping are, how they differ, and why both matter. Plus, I’ll show you some tools, tips, and mistakes to avoid so your next shot actually tastes like it should.
Key Takeaways:
1 – Leveling and tamping are not the same thing: Leveling distributes the grounds evenly before tamping. Without it, water finds weak spots and causes channeling. On the other hand, tamping compresses the grounds to create resistance for proper espresso extraction.
2 – You need both steps for great espresso: Leveling ensures a flat, even bed. Meanwhile tamping ensures consistent pressure. You shouldn’t skip either one or another.
3 – The right tools make prep easier and more consistent: Use a WDT tool or leveler to distribute, and a flat tamper (spring-loaded if possible) for even pressure. You can combine tools from brands like Normcore or MATOW, which are great for simplifying the process.
What Is Leveling in Espresso (and Why It Matters)
Leveling is all about ensuring your coffee grounds are spread out nicely and evenly in the portafilter before tamping.
Sounds basic, right? But skip it, and you’re asking for trouble. When you pour coffee into your basket, it lands in a little mound and if you tamp it like that?
Well, the water’s gonna punch right through the low spots and ignore the rest. That’s what we call channeling, and it ruins a shot.
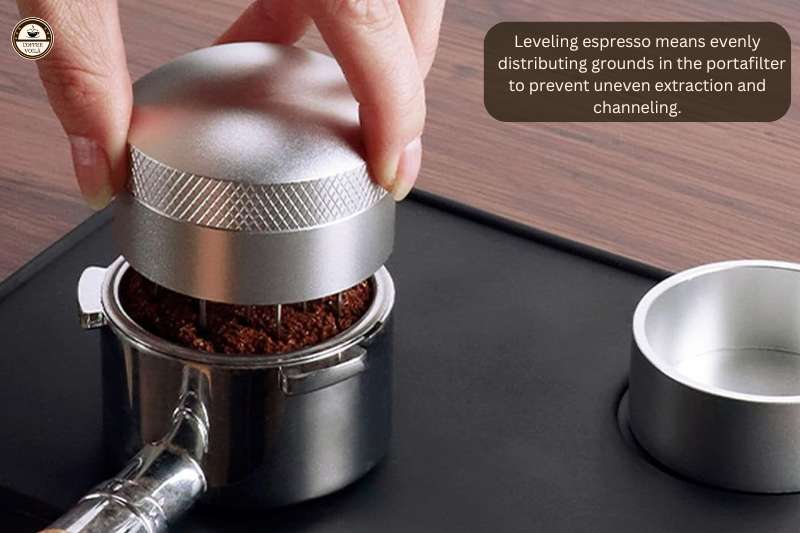
The point of leveling is to give your tamper a flat, consistent bed to press down on. You want uniform density from edge to edge. In other words, no dips or high spots. Just an even puck that’ll resist water equally all the way through.
Because even if you’re tamping perfectly, if the grounds are slanted or clumpy underneath, you’re fighting a losing battle.
I’ve been there sipping a fast-looking shot that tasted weirdly hollow. Usually, this has to do with uneven distribution.
Tools Used
You’ve got options for leveling your espresso puck, depending on how precise you want to get:
- Finger swipe – Quick and old-school. Just level the grounds with your finger in a back-and-forth motion. I used this for years before upgrading.
- WDT tool (Weiss Distribution Technique) – Looks like a tiny rake with an acupuncture needle. Helps break up clumps and evenly distribute the grounds.
- OCD tool – Short for “Ona Coffee Distributor,” it spins across the surface and flattens it perfectly. Great for consistency.
- Palm tapping – Lightly tap the portafilter on the side or bottom to help settle the grounds. Simple but effective when you’re in a rush.
Notes: Try a few out and see what feels right. Just don’t skip leveling, it’s low ef ort and high reward.
When Do You Need to Level?
Always do it right after you’ve dosed your grounds into the portafilter. Before tamping.
Don’t press down until that surface is flat and fluffy (or smoothed out if you’re using a tool). If you tamp before leveling, you’re locking in uneven density, and once it’s tamped, there’s no going back.
What Is Tamping in Espresso?
If you’ve ever watched a barista press down on a bed of coffee with that satisfying thunk, you’ve seen tamping in action. It’s the step where you apply downward pressure to compact the coffee grounds in the portafilter.
Though it sounds easy, get it wrong and you’ll end up with a sour shot or a bitter over-extracted coffee.

The whole point of tamping is to create an evenly compressed puck. You want uniform resistance. So the water flows through the grounds at just the right speed.
- Too loose: Water races through and under-extracts.
- Too tight: Even worse, uneven and you’ll get channeling, bitterness, or that annoying “spritz” if you’re using a bottomless portafilter.
I’ve messed up plenty of shots thinking tamping was all about brute strength. It’s not. It’s about control.
Tools Used
- Flat tamper
- Convex tamper
Personally, I like the Normcore spring-loaded flat tamper. It helps keep the pressure consistent every time, and it just feels solid in the hand.
But I’ve also used a basic aluminum tamper with no issue, especially when I was just starting out.
Just make sure it fits your basket snugly (58mm for most machines), or you’ll end up tamping off-center without even realizing it.
When to Tamp?
Always tamp after you’ve leveled your grounds. Think of leveling as setting the stage and tamping as locking it in. It’s the final prep before the magic happens. Don’t skip it, and definitely don’t rush it. A calm, centered tamp goes a long way toward a solid espresso shot.
Tamping vs Leveling – Key Differences
It’s easy to mix them up, but tamping and leveling play have different roles. And skipping or rushing one can wreck your shot.
| Aspect | Leveling | Tamping |
|---|---|---|
| Purpose | Evenly distributes coffee grounds | Compresses coffee grounds evenly |
| When to Do It | Immediately after dosing, before tamping | Right after leveling, final prep step |
| Common Tools | WDT tool, OCD tool, Normcore Leveler, finger swipe | Flat tamper, convex tamper, spring-loaded tamper |
| Main Benefit | Prevents channeling, ensures even density | Creates proper resistance for extraction |
| Effect if Skipped | Uneven extraction, channeling, weak or sour coffee | Fast or uneven extraction, weak or bitter coffee |
Final Notes:
So, leveling sets the stage. Without it, your puck’s uneven and prone to channeling. Meanwhile, tamping is your finishing move, locking it all in so the water flows through with the right resistance. For this reason, both steps matter, and together they make your espresso better.
How to Level and Tamp Like a Pro?
So, let’s talk about the steps you can take to properly tamp your espresso:
Leveling Steps:
1 – Break up clumps with a WDT tool
After dosing, use a WDT (Weiss Distribution Technique) tool to gently stir and declump your grounds.
2 – Spin your distribution tool
Next, use something like the Normcore Leveler. Then spin it slowly and evenly (think of icing a cake). You’re just flattening the surface, and not compressing.
3 – Adjust depth carefully
Don’t let the tool sink too deep or too shallow. If it compresses the puck before tamping, extraction will suffer.
4 – Stay consistent
Whether you’re using a tool or doing the finger swipe, aim for gentle, even movement. One smooth pass is better than a messy shuffle.
Tamping Steps:
1 – Apply 20–30 lbs of pressure
I use a spring-loaded tamper (Normcore V4) to keep things simple. Not sure how hard to press? Try it on a bathroom scale until you get a feel.
2 – Keep the tamper level
No tilting. Uneven tamps = uneven shots. Always check from the side if needed.
3 – Add a light twist (optional)
Give it a quick polish twist at the end. Some say it doesn’t matter, but it helps seal the surface.
Final Bonus Tips:
- Dry your portafilter basket before dosing. Even a bit of moisture can cause clumping.
- Don’t overthink the pressure—consistency matters more than brute force.
- If you’re using a bottomless portafilter and getting side sprays? It’s probably your leveling or tamping that needs work.
- And lastly: practice with one coffee for a while. It helps you isolate puck prep issues without variables from different beans.
Best Tools for Leveling and Tamping
Over the years, I’ve tried a bunch of gear, but these are the ones I actually keep on my coffee bar. I find them reliable and consistent, and they make life easier.
Distribution Tools
WDT Tool (Weiss Distribution Technique)

If you’re still poking around with a toothpick, guess what? It’s time to upgrade. A proper WDT tool (like the ones from LeverCraft, Espresso Parts, or Normcore) helps break up clumps and evenly fluff your grounds before anything else. This step alone fixed a ton of channeling issues for me.
Normcore Leveler
It spins on top of the portafilter like you’re frosting a cake. I use the Normcore Leveler V2, and the adjustable depth means you won’t accidentally compress the puck while distributing.

OCD V3 Tool by Nucleus Coffee
Just set it on your basket and give it a smooth spin. This helps to flatten the grounds evenly every time. It’s on the pricier end, but if consistency matters to you, then it’s worth it.

Tampers
Normcore Spring-Loaded Tamper (V4)
If I had to recommend one tamper to any home barista, it’s this. The spring-loaded mechanism gives you a consistent 30 lbs of pressure. Plus, it forces you to tamp level every time, which is half the battle.

Pesado 58.5 Tamper
If you want ultra-precise fits and a bit of heft in hand, the Pesado 58.5 is a beast. It’s engineered to match snugly with 58mm baskets, leaving virtually no room for uneven edges.

I love the weight and the feel. Furthermore, you can customize the handle style if you’re into that sleek, personalized barista vibe.
MATOW Dual Head Leveler & Tamper (58mm)
This one’s super handy. It has a distribution leveler on one side and a flat tamper on the other.

If you’re a beginner or don’t want too many tools, this is ideal. However, it isn’t as adjustable as high-end tools. But for everyday espresso, it gives you solid consistency without the extra clutter.
Last Thoughts
Got questions I didn’t cover? Or maybe you’ve tried a tool I totally missed? I’d love to read your thoughts in the comments below and with that, voilà!


